A new encounter can be started for every patient in the facility. Patients visit the facility for different purposes; e.g., it can be a new visit, follow-up visit, visit for body checkup, etc.
To start an Encounter:
| 1. | On the Facesheet screen, click Start Encounter. |
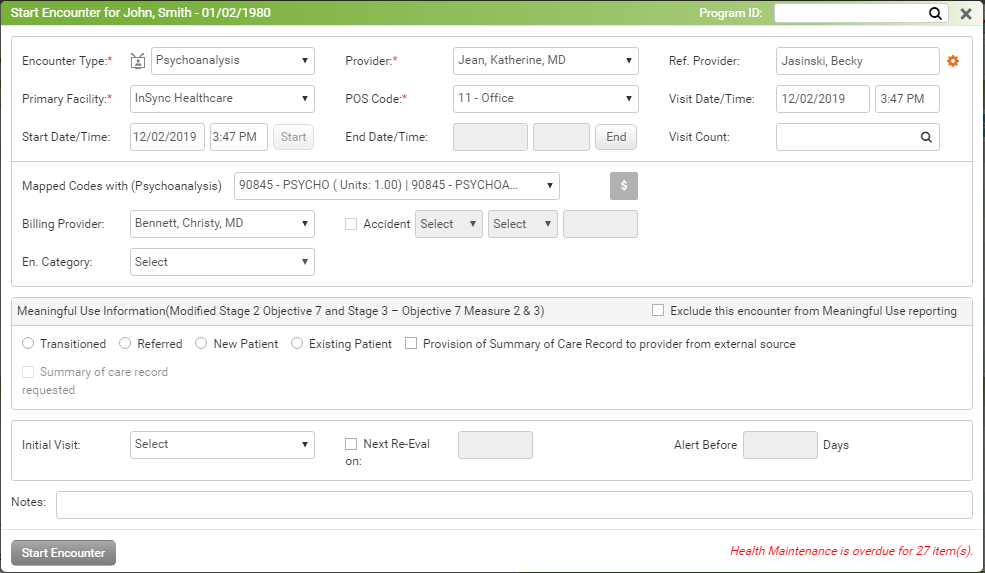
| 2. | On the Start Encounter screen, enter the following details: |
| • | Select the Encounter Type, such as New Patient, Follow Up, New Visit, etc., from the drop-down list. The values displayed in the Encounter Type drop-down can be configured from the Administration section. |
| • | Select the Provider from the drop-down list. |
| o | If you are logged in as a provider, your name will default into the Provider field. |
| o | If you are a staff member, patient’s primary provider will appear. |
| o | If the patient does not have any primary provider recorded, then the Provider field will remain blank. |
| • | In the Referring Provider field, start typing provider name and select using the smart search results. |
| Note: If referring provider you are looking for is not added in the system, click the  icon to add a new referring provider. icon to add a new referring provider. |
| • | Select the Primary Facility from the drop-down list. |
| Note: When you start encounter from Scheduler, you can change Facility from the given list. |
| • | Select the POS Code, such as 11 - office, 12 - patient’s home, etc., from the drop-down list. |
| Note: The values shown in the POS Code drop-down list are hard coded in the system. |
| • | Select the Visit Date using Calendar and enter Time. |
| • | The Start Date/Time field is populated with current date and time, change date and time if required. |
| • | Locate the End Date/Time field. Click the End button to get the current date and time in this field. |
| Note: You can leave the End Time field blank at this point and can update later at the time of ending this encounter. Even if you skip to record it when ending encounter, you can still record it by clicking More link from Facesheet. |
| • | Select Visit Count, if any. |
| • | In the Meaningful Use Information section, do the following: |
| o | To skip this encounter from MU reporting, select the Exclude this encounter from Meaningful Use reporting check box. |
| o | Select the “Transition of Care” check box and provide the transition date using the calendar button if the patient is transited from some other practice. This helps to qualify for “MU Stage-1 – Menu Set 8 – Medication Reconciliation” measure. |
| o | If the clinical summary document of the existing patient is been provided, select the “Provision of Summary of Care Record to provider from external source” check box. Denominator for “MU Stage-2 – Core 14 – Medication Reconciliation” measure will increase if either the “New Patient” radio button is selected or both the “Existing Patient” radio button and the “Provision of Summary…” check box are selected. |
| • | Select the Accident check box if the patient visit is due to an accident, then select Accident Type, Accident State, and Accident Date. |
| • | At the time of booking an appointment, if you select the authorization number, it will also appear on the Start Encounter screen. |
| • | Type in additional information in the Notes field, if necessary. These notes can be viewed on the Encounter note in the header section. |
| • | Select the Next Re-Eval date to track the re-evaluations. |
| • | Select the Program ID from the top right corner of the screen in case you want to start an encounter for any case. |
| 3. | Click Start Encounter. The screen is displayed with a list of charting elements based on the configuration done for that provider. You can now start recording the details, such as such as chief complaints/history of present illnesses (HPI), problem list, vitals information, medications, history, treatment plan, review of systems, immunizations, health maintenance, results/order queue, physical exam, diagnosis, review of results, and supplementary. For more details on recording charting elements, refer to Facesheet Menu Items. |
Notes:
| • | Starting an encounter is one of the criteria to increase denominator for following cores of MU-2. |
| o | Core 1a: CPOE for Medication Orders |
| o | Core 1b: CPOE for Lab Orders |
| o | Core 1c: CPOE for Radiology Orders |
| o | Core 2: E- Prescribing (eRx) |
| o | Core 3: Record Demographics |
| o | Core 4: Record and chart changes in vital signs |
| o | Core 5: Record smoking status for patients 13 years or older |
| o | Core 7a: Patient electronic access - Patient Portal access |
| o | Core 7b: Patient electronic access - view, download, or transmit |
| o | Core 8: Provide clinical summaries for patients for each office visit |
| o | Core 10: Incorporate clinical lab test results as a structured data |
| o | Core 12: Use clinically relevant information to identify patients who should receive reminders for preventive/follow-up care and send these patients the reminders, per patient preference |
| o | Core 13: Use clinically relevant information from Certified EHR Technology to identify patient-specific education resources and provide those resources to the patient |
| o | Core 14: Medication Reconciliation |
| o | Core 17: Use Secure Electronic Messaging |
| o | Menu Set 2: Record electronic notes in patient records |
| o | Menu Set 3: Imaging Results |
| o | Menu Set 4: Record Family health history |
Please refer to the above sections in Meaningful Use Stage – 2 User Guide for more details.