Once test results are received to the practice from laboratories, users can add them manually to system.
To record a test result manually:
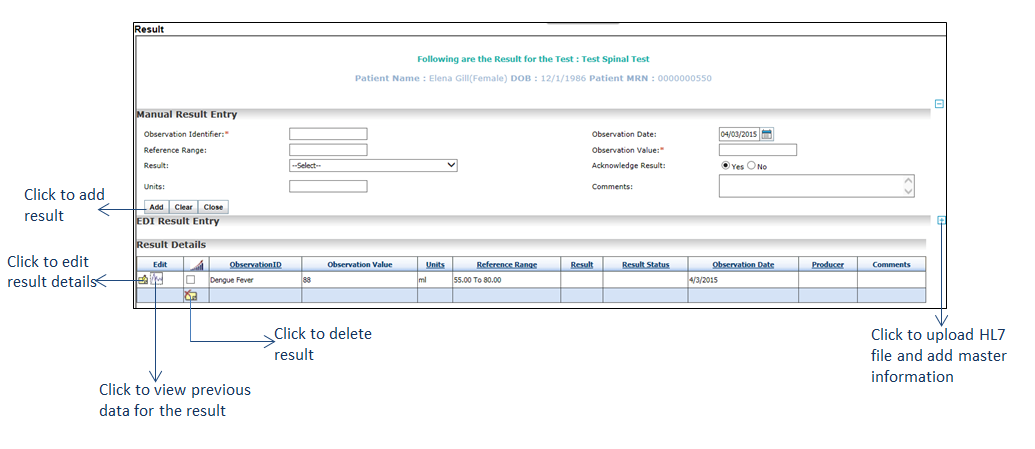
| 1. | On the Results/Orders Queue screen, in the Pending Orders tab, click Add Result corresponding to the test. The Result screen is displayed. |
| 2. | Enter the result or start typing in the result in the Observation Identifier and select the result from the configured list displayed. This is a mandatory field. |
Note: Once the result is selected from the configured list, certain fields are auto-populated with the respective values. For details on configuration, please refer to Lab Result.
| 3. | Enter the Observation Date or select the date using the calendar icon. |
| 4. | The Reference Range is auto-populated if configured for the selected observation identifier. If not, enter the range in the Reference Range field. |
| 5. | Enter the value in Observation Value. This is a mandatory field. |
| 6. | Select the Result from the drop-down list. |
| 7. | Acknowledge the result by selecting Yes or No option. |
| 8. | Enter the Units, e.g., “mg”. |
| 9. | Enter other details in Comments, if any. |
| 10. | Click Add. The result details are added in the grid below. |
Notes:
| • | Click the Edit icon  to edit the details added. to edit the details added. |
| • | Select the check box corresponding to the result you want to delete and click the Delete icon to delete the result. to delete the result. |
| • | Click the icon by selecting the check boxes near the Result name to view the graph based on the results. icon by selecting the check boxes near the Result name to view the graph based on the results. |
| • | Click the  icon near the edit icon to view the previous data of that particular test result, if any. icon near the edit icon to view the previous data of that particular test result, if any. |
| 11. | Click Close. The order is now moved to the Results tab and is updated in the Results panel on the Facesheet screen. |
Notes:
| • | On the Results/Orders Queue screen, select the Category as Radiology or Special Studies from the drop-down list. Click Add Result corresponding to the test and follow similar steps to add results for radiology and special studies tests. |
| • | Once you have added a result and closed the Results screen, you can modify it, add a new result, or delete it from the Results tab, and by expanding the Results panel on the Facesheet screen. To do so, click the icon corresponding to the test and click the Result link. icon corresponding to the test and click the Result link. |
| • | Receiving a radiology result electronically or manually is the criteria to increase numerator for “Menu Set 3: Imaging Results” of MU-2. Please refer to the above section in Meaningful Use Stage – 2 User Guide for more details. |
| • | Receiving a lab result electronically or manually is the criteria to increase numerator for “Core 10: Incorporate clinical lab test results as a structured data” of MU-2. Please refer to the above section in Meaningful Use Stage – 2 User Guide for more details. |