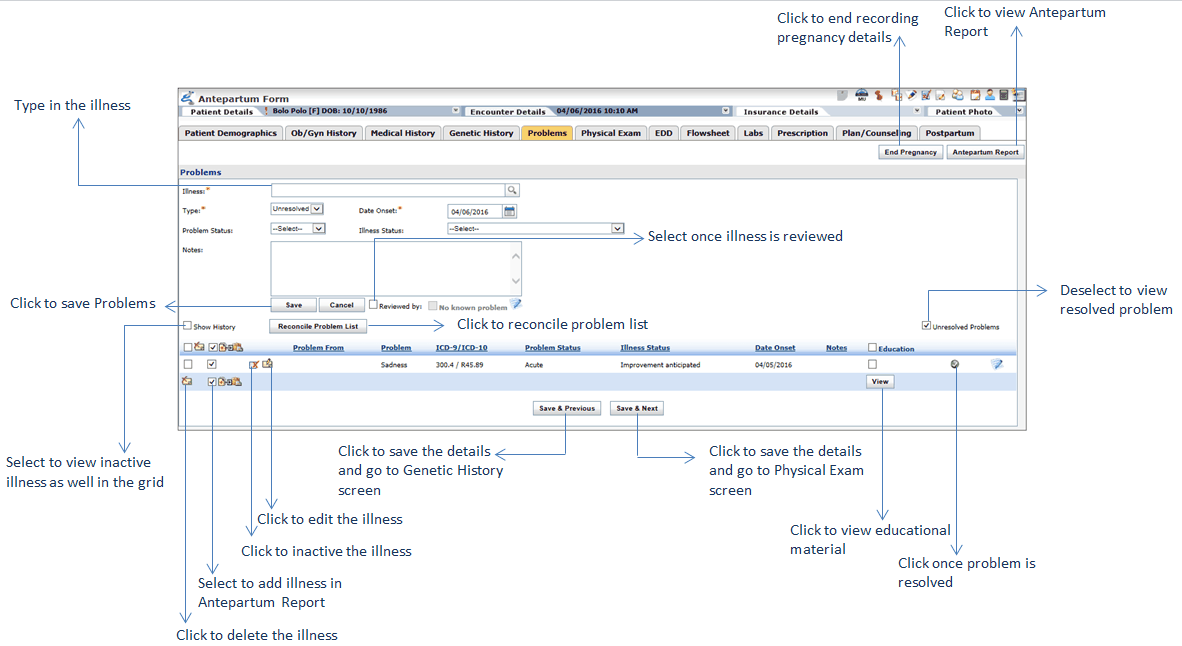
The Problem List charting element allows providers record all the illnesses and problems faced by the patient. These problems are displayed on Antepartum Form in the Problems tab. If the problems are not recorded earlier, you can still record them on this form. All these recorded problems appear on the Encounter note; however, users must select the check boxes prior to the problems listed, to display them on the Antepartum Report.
All these recorded problems appear on the Encounter note; however, users must select the check boxes prior to the problems listed, to display them on the Antepartum Report.
To record a problems:
| 1. | In the charting elements ribbon, click Antepartum Form. |
| 2. | To open problems section, click Problems.The Problem screen is displayed. By default, unresolved problems are displayed. Deselect the Unresolved Problems check box to view the list of resolved problems. |
| 3. | Start typing the illness and select Enter the first 2 characters in the Illness field and select the illness from smart search results. |
| 4. | The Selected Illness screen is displayed with the list of selected illnesses. |
| 5. | Click Save. The illness from the list van be removed by clicking the Remove button. |
| 6. | Select the Problem Type (resolved or unresolved) from the drop-down list. |
| 7. | Select the Date Onset using the calendar button. |
| 8. | Select the Problem Status (chronic, acute, etc.) from the drop-down list. |
| 9. | Select the Illness Status (controlled, well controlled, etc.) from the drop-down list. |
| 10. | Enter the notes pertaining to problem list, if any. |
| 11. | Click Save. The selected illness is added to the grid. |
| 12. | To display the problems on the Antepartum Report, select the check box prior to the problem's description. |
| 13. | Once you add all the problems, click Save & Next. The Physical Exam screen is displayed. |
Notes:
| • | Once the problem list is reviewed, select the Reviewed by check box. Your name will display as a reviewer along with date and time. |
| • | Select the No Known Problem check box if the patient does not have any known problems. This helps in achieving Meaningful Use. |
| • | If a problem is added by mistake, it can be deactivated. Click the Deactivate icon to deactivate the corresponding problem added, or select one or more check boxes corresponding to the problems and click the Deactivate icon to deactivate the corresponding problem added, or select one or more check boxes corresponding to the problems and click the Deactivate icon to deactivate the selected problems. to deactivate the selected problems. |
| • | Select the Show History check box to view the list of active and inactive problems. Select the check box corresponding to the inactive problem and click the Activate icon to activate the selected problems. to activate the selected problems. |
| • | Once the problem is resolved or cured, click the Mark as Resolved icon corresponding to that illness so that the illness is marked as resolved. corresponding to that illness so that the illness is marked as resolved. |
| • | You can also view the education material related to the specific illness by selecting the check box in the Education column and clicking View. The education material can be exported to PDF, printed, and provided to the patient as well. Providing education material helps in increasing numerator for “Core 13: Use clinically relevant information from Certified EHR Technology to identify patient-specific education resources and provide those resources to the patient” of MU-2. Please refer to the above section in Meaningful Use Stage – 2 User Guide for more details. |
| • | Click the icon to view the details such as Created By, Created On, Modified By, and Modified On. to view the details such as Created By, Created On, Modified By, and Modified On. |