Any special studies performed on the patient can be recorded in the Special Studies section. In Special Studies, you can enter notes in 2 ways: common notes for all the special studies tests and line item level notes for each special study done for the patient. The ready-made templates can be used to insert the notes. The user can configure these templates in the system, also known as macros. The order status can be recorded as performed, reviewed, etc.
The tests recorded are displayed on the Special Studies ribbon along with the CPT code, number of units ordered, diagnosis codes attached to the order, modifiers, and generalized notes.
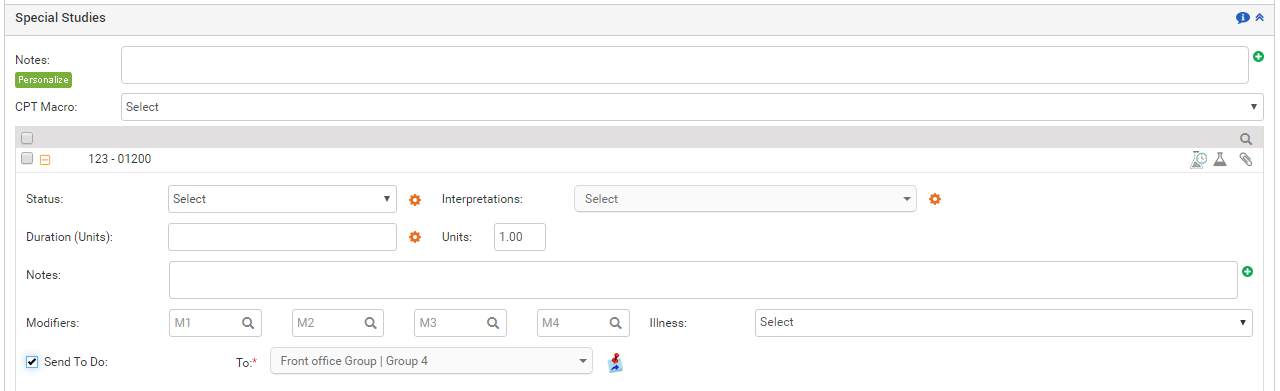
To record the special studies performed on the patient from Treatment Plan:
| 1. | On the Treatment Plan screen, click the Special Studies link. |
| 2. | On clicking the Special Studies link, a list of configured special studies appears. |
| • | Enter any generalized notes pertaining to all the special studies being recorded. |
Note: Click the  icon near the Note box to use the preconfigured notes added with the help of macros. The macros can be configured from the Administration > Treatment Plan > Special Studies section.
| • | To search any specific special studies you can use quick search panel that appears just above the listed special studies. |
| • | From the list of special studies that are displayed along with the CPT code, select the check boxes near the test name to order them. |
| • | Click the Plus icon ( ) near the special study name to expand the details. ) near the special study name to expand the details. |
| • | Select the order Status (Pending, Reviewed, Performed, Completed, Late Pending, Authorization Pending, or Ordered) from the drop-down list. |
Notes:
| o | The order statuses are hard coded in the system. |
| o | On selecting Pending, Late Pending, and Authorization Pending options, a new field appears named “Schedule Date.” This helps to view a list of scheduled tests when viewing C-CDA file from Facesheet. |
| o | On selecting Reviewed, Performed, or Completed status, the system considers that the result is recorded for the test and moves the test into the Results tab on the Results/Orders Queue screen. |
| • | Enter any notes pertaining to the selected special study item. |
Note: Click the icon near the Note box to use the preconfigured notes added with the help of macros. The macros can be configured from the Administration > Treatment Plan > Special Studies section.
| • | Select duration using drop-down list. Units are then updated as per the duration selected. |
Note: Click the  icon to configure or update combinations of duration and units.
| • | Enter the number of units in case duration is not selected. |
| • | Click the magnifier icon ( ) to search for modifiers and select them, or you can also type in the box if you know the modifier. Maximum 4 modifiers can be added. ) to search for modifiers and select them, or you can also type in the box if you know the modifier. Maximum 4 modifiers can be added. |
| • | Hover mouse over the Illness section. A list of illnesses recorded in the Diagnosis section of that encounter appears for selection. |
| • | Select the desired user or user group to whom you want to assign To Do for this specific element using Assign To Do drop-down and click  . . |
| 3. | Once the special studies items are recorded, they can be viewed on the Special Studies ribbon along with the CPT code, number of units ordered, diagnosis codes attached to the order, modifiers, and generalized notes. |
Note: Recording the units, modifiers, and illnesses helps the PM users to import these details automatically when creating a charge.