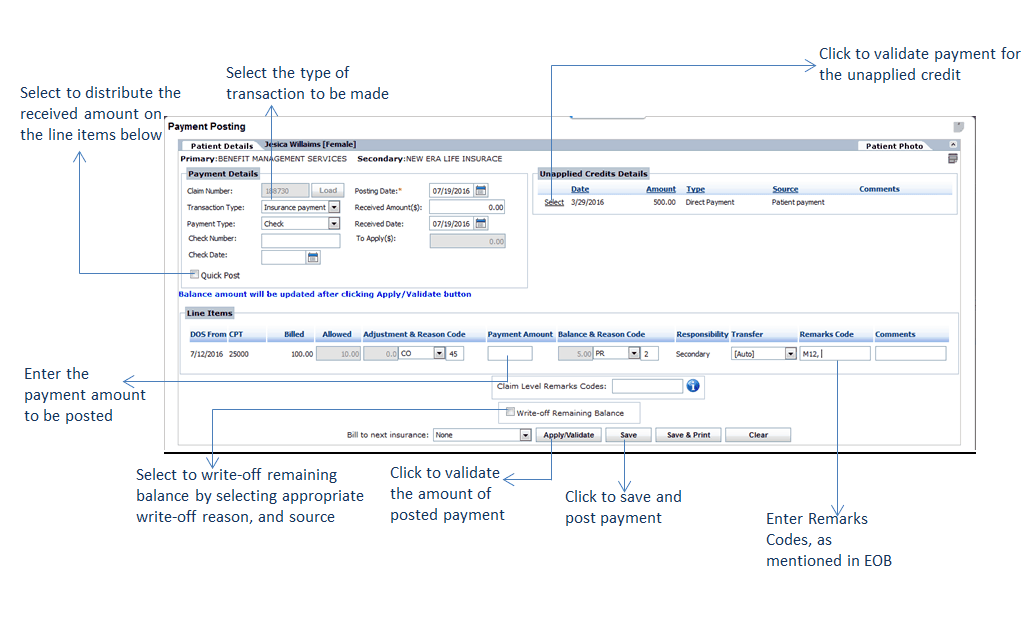
Posting a payment involves associating payment with a particular charge, or line item, on the claim form. To manually post a payment, click on the “Post Payment” link next to the patient payment listing. This will open the Payment Posting window.
The Payment Posting screen will display payment details, including claim number, transaction type, payment type, posting date, and received amount/date. At the top of the screen, the user will also be able to view the Patient Details section of the Patient Ribbon, which provides the user with a quick look at patient balances, copay, and insurance/patient unapplied credits.
To fill in Payment Details:
| 1. | Select the Transaction Type using the drop-down menu. This is defaulted to “Insurance Payment.” |
| Note: Fields will appear available/unavailable to users depending on Transaction Type selected. |
| 2. | The Posting Date will be prepopulated with the current date. |
| Note: To select a new Posting Date from the Calendar, click the icon. icon. |
| 3. | Select Payment Type using the drop-down menu and fill in any additional details (check/credit card #). |
| 4. | Enter the Received Amount. |
| Note: The Applied Amount will prepopulate upon the user entering the Received Amount. |
| 5. | The Received Date will be prepopulated with the current date. If the Received Date is not the current date, select the Received Date from the Calendar by clicking the icon. icon. |
| 6. | Enter the Payment Amount next to each line item listed. |
| 7. | Select a Reason Code, if desired. When the reason code is not entered, following message is displayed intimating about reason code selection. |
| 8. | If the user has selected to apply Adjustment/Reason Codes, you will be able to View/Edit them here by clicking on the View/Edit link. |
| Note: If Transaction Type is “Insurance Payment,” the payer will include a Reason Code on the ERA. This code represents why the billed amount has been adjusted and the reason for the remaining balance. |
| 9. | The Balance is prepopulated. This is calculated by subtracting Payment and Adjustment(s) from the Allowed Amount. |
| 10. | Use the Bill to Next Insurance drop-down to indicate the posting of payment to a secondary insurance. |
| Note: If not set up for auto-forwarding, users will need to do this manually. Once the user has indicated a secondary insurance, the payment will display as a new claim in the Claims Processing screen and will need to be resubmitted. |
| 11. | Enter the remark codes as displayed in ERA. |
| 12. | Enter comments if any. |
| 13. | Enter claim level remark codes. |
When you have finished entering payment, click the “Apply/Validate” button. This will check that the amount of the posted payment is equivalent to the amount received.
The balance amount will now appear updated in the Patient Details at the top of the screen, as well as in the Patient Ribbon.
Click “Save” to save payment information and post the payment; this payment will now display on system reports. Click the “Save & Print” button to save payment information and open the payment into a new window for printing; to clear payment information, click the “Clear” button.
After clicking “Save,” the user will then see a message. Select “Yes” to apply the remaining amount to a different claim automatically. After making a selection, the user will then receive a confirmation message indicating the amount has been successfully posted. By selecting No, the system will post the rest of the balance as Insurance unapplied credit.


