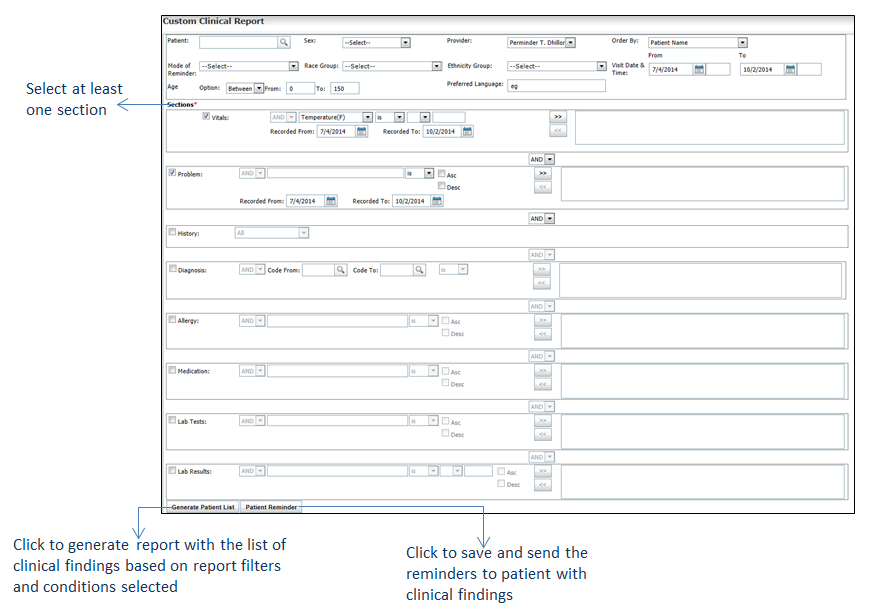
Custom Clinical Report is generated with the list of clinical information recorded for the patients. This report is useful if you want to view the clinical findings and send them to the patient.
| 1. | From the left menu items, click Reports > Utilization Reports > Custom Clinical Report. The Custom Clinical Report screen is displayed. |
| 2. | The following are the report filters available, based on which the report is to be generated: |
| • | Start typing the patient name and select the name from the list or enter the Patient name. You can also search the patient using the  icon. icon. |
| • | Select the Sex as Male or Female from the drop-down list. |
| • | Select the Provider from the drop-down list. |
| • | Select the Order By as Patient Name, Patient Age, Patient Sex, Patient Race, Patient Ethnicity, Reminder Mode, or Visit Date & Time from the drop-down list. |
| • | Select the Mode of Reminder as Email, Phone, Do not correspond, Mail, or Secure message via portal from the drop-down list. |
| • | Select the Race Group as American Indian or Alaska Native, Asian, Black or African American, Native Hawaiian or Other Pacific Islander, or White from the drop-down list. |
| • | Select the Ethnicity Group as Hispanic or Latino, or Not Hispanic or Latino from the drop-down list. |
| • | Enter or select the Visit Date From and To using the calendar icon. Enter the time in the text field. |
| • | Select the Age Range as Above the Age Of, Below the Age Of, or Age Between from the drop-down list. Based on the selection, enter the age in the text field. |
| • | Start typing the Preferred Language and select the language from the list. |
Note: You can add one or more preferred languages. Click  corresponding to the language to remove it.
| 3. | In the Sections, the following are the conditions added based on which the report is generated: |
| • | Select at least one section by selecting the check box correspondingly. |
| • | Select the appropriate values from the drop-down list. |
| • | Select the Recorded From and To date using the calendar icon, or enter the date. |
| • | Click >> to add the condition on the right side to the list. To remove the condition added, select it and click <<. More than one condition can be added for a section. |
| • | Before adding the next condition or section, select AND or OR from the drop-down list. |
| o | AND: Select to include more conditions. All the conditions must be satisfied. |
| o | OR: Select to include optional conditions. Any one condition must be satisfied. |
The report is generated based on the conditions.
| 4. | Click Generate Patient List. The Custom Clinical Report is generated with the list of clinical findings based on the report filters and conditions selected. |
| 5. | From the Custom Clinical Report screen, click Patient Reminder, to navigate to the Patient Reminders for Clinical Findings screen, where you can save and send the reminders to the patient with the clinical findings. |
| 6. | On the Patient Reminders for Clinical Findings screen, to send reminders, do the following: |
| • | Select the check box corresponding to the patient name in the last column if you wish to send the reminder. |
| • | Select the Method of communication used to send reminder as Email, Phone, Do not correspond, Mail, or Secure message via portal from the drop-down list. The Secure message via portal is displayed for patient portal users only. Once Secure message via portal is selected, the Subject and Details fields are displayed. Enter a relevant subject. Add the necessary details in the Details field. Click Clear to clear the entries. |
| • | The Date reminder was sent field is populated with the current date. Enter the date or select the date using the calendar icon that pops up once you click the field. |
| • | Click Save Sent Reminders & Send Reminders via Portal. The clinical findings are saved and sent to the patients successfully. |
Note: Sending a reminder to the patient will help in increasing the numerator for “Core 12: Use clinically relevant information to identify patients who should receive reminders for preventive/follow-up care and send these patients the reminders, per patient preference” of MU-2. Please refer to the above section in Meaningful Use Stage – 2 User Guide for more details.
| • | Select the Show Previously Recorded Reminders check box to view the active reminders recorded previously. Click the  icon to update the method of communication and date reminder details. Click the icon to update the method of communication and date reminder details. Click the  icon to inactivate the reminder. You can view the inactive reminders by deselecting the Active check box and click the icon to inactivate the reminder. You can view the inactive reminders by deselecting the Active check box and click the  icon to reactivate the reminder. icon to reactivate the reminder. |

![]() corresponding to the language to remove it.
corresponding to the language to remove it.
