Access settings configuration is done for a role or resources, such that they can log in to the site only on permitted days and cannot log in to the site if they are restricted. In case of logging in on restricted days, the specified user will be notified.
To configure access settings:
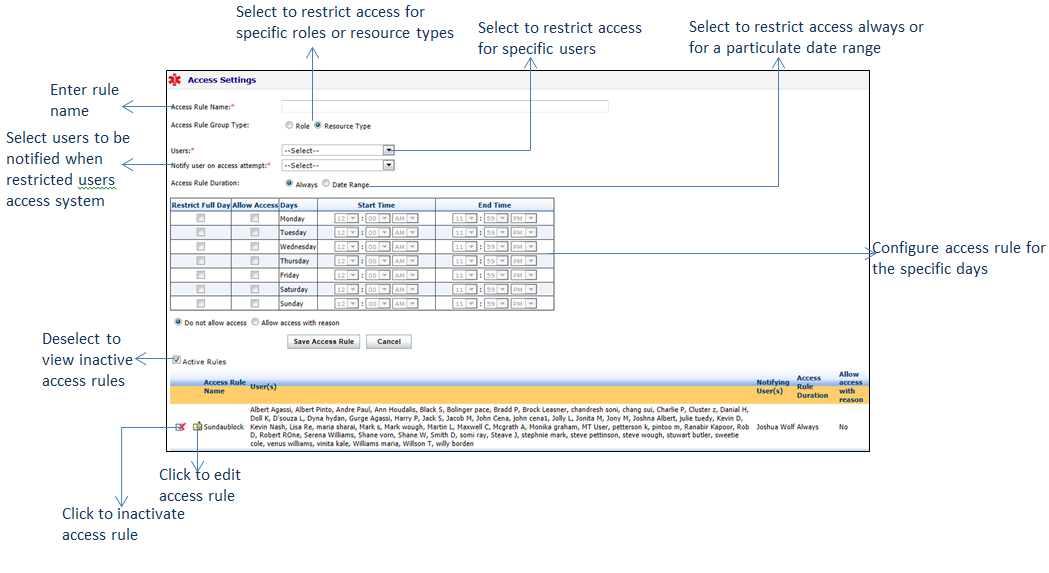
| 1. | On the Practice Defaults screen, scroll down to view the Access Settings panel. Click the panel to expand it. |
| 2. | In the Access Settings panel, do the following: |
| • | Access Rule Name: Specify the rule name. This field is mandatory. |
| • | Access Rule Group Type: Select from the 2 options: Role or Resource Type. |
| o | To restrict user access for specific roles, select Role and then select one or more roles from the very next drop-down list (e.g., Biller, Staff, Admin, Front Office Executive). |
| o | To restrict user access for specific resource types, select Resource Type and then select one or more resource types from the very next drop-down list (e.g., Provider, Assistant). |
| • | Users: To restrict access of specific users, select one or more users from the drop-down list. When you select Role or Resource Type above, the system automatically selects the users who are included in that group. This field is mandatory. |
| • | Notify user on access attempt: Select one or more users to be notified when the restricted user(s) accesses the application. This field is mandatory. |
| • | Access Rule Duration: Select how long you want to restrict the access. It can be always or for a specified duration. |
| o | Always: By default, the Always option is selected. Upon selecting this option, the user will be restricted forever for the mentioned days. |
| o | Date Range: On selecting this option, the From Date and To Date fields will become visible to enter the period during which the access is to be restricted. |
| • | In the Access table, do the following: |
| o | Restrict Full Day: Select the check box corresponding to the day you wish to restrict access. |
| o | Allow Access: This column is useful when you want to restrict the user for a specific time during the day. Select appropriate check boxes and enter the duration up to which you want to allow access during that day. |
| • | Do not allow access: By default, this option is selected to restrict the access completely. When this option is selected, the restricted user will not be able to access the system during the restriction period. |
| • | Allow access with reason: If you wish to allow access on an emergency basis, select this option. When this option is selected, the restricted user will be able to access the application during the restricted period, subject to the reason being entered for accessing application. |
| 3. | Click Save Access Role. The access rule is added to the grid below. |
| 4. | Click Save at the bottom of the screen to save the changes. |
Notes:
| • | Click the edit icon  to update the details of the access rule. to update the details of the access rule. |
| • | Click the inactivate icon to inactivate the access rule details. to inactivate the access rule details. |
| • | Deselect the Active Rules check box to view the list of inactive access rules. Click the activate icon to reactivate the corresponding access rule. to reactivate the corresponding access rule. |